
An Automated Voice Calling Chatbot (Part 2): How to create the chatbot in Amazon Lex
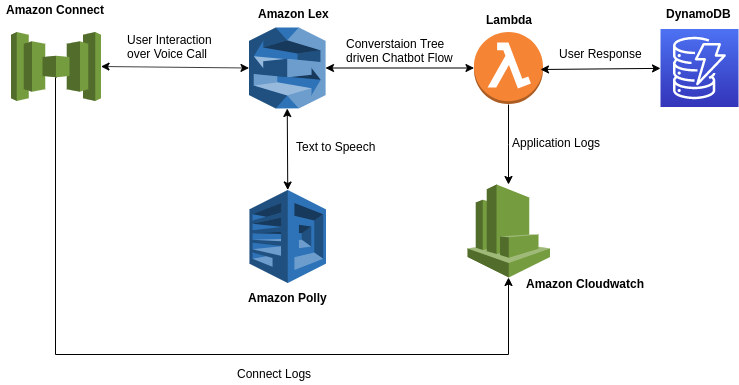
This blog is a continuation of the series of blogs where I describe how I went about implementing a chatbot over a voice call to automate monotonous calls. You can find an overview of the complete implementation here.
This is the second blog in this series and will detail how I went about creating the chatbot using Amazon Lex.
How to create a chatbot on Amazon Lex?
In this section, I will explain how you can create a chatbot on Amazon Lex, but before that, it’s important that we understand a few things internal to how a chatbot on Amazon Lex functions and the terminologies used.
Below are some important terminologies that will be used further when I explain the functioning of the chatbot.
Intent: Intent is defined as what the user’s intention is. Say for instance a user speaks “I want to book a cab” we can clearly see that the user wants to perform an action i.e Booking a cab. He can now say that in many ways such as “Get me a cab” or “I want a taxi” but in all the above cases we can say that the user’s intention is always to perform that one single action i.e Booking a cab.
Intent Classification: Now that you know what intent is, let’s assume we have created a chatbot that can perform multiple actions and hence we need to understand when a user response is received what action does it map to, this is where we classify user responses into different intents so that we can map them to the right intent and execute the correct action.
Slots: Slots are entities within an intent i.e they are attributes that are required to fulfill the action mapped to a certain intent. For Eg: The user wants to book a cab so he says “I want to book a cab” but that is not enough information for us to fulfill the action as we do not know the source and destination of the cab. We can then ask setup the user follow up questions to set these attributes like “Where do you need the cab from?” or “Where do you need the cab to?”, alternatively the attributes can be directly received from the user’s first response when the user says something like “Get me a cab from Delhi to Agra”. Here, we know what the destination and source are so we can set these attributes straight away and request for any other info to fulfill an intent. These attributes that we set using user response is what we call Slots.
Slot Filling: Slot filling is an activity that is performed to request all the required slots to fulfill an intent. For Eg: When we take an example of booking a cab we need the following slots filled in order to fulfill the intent: Destination, Source and Time. So when we classify the first response from the user to an intent we get to know what are the different slots that are already filled, we can then perform an activity of asking specific questions to fill specific slots to fulfill the intent.
Conversation Context: This is an object that is passed to and fro between each user response and bot response so that the context of the conversation can be inferred by the bot in the next response. The object is mainly composed of 2specific nodes, first being the status of the slots in an intent, second being the session attributes, which is basically the metadata about a conversation, these are generally used to share information between intents.
OK! I get the terminologies, but how do you create a chatbot in Amazon Lex?
Sure, so once you are on the AWS console and have navigated your way over to Amazon Lex, it only takes you a few clicks to set up a custom Amazon Lex chatbot. Let’s have a look at a few screenshots below to understand this.
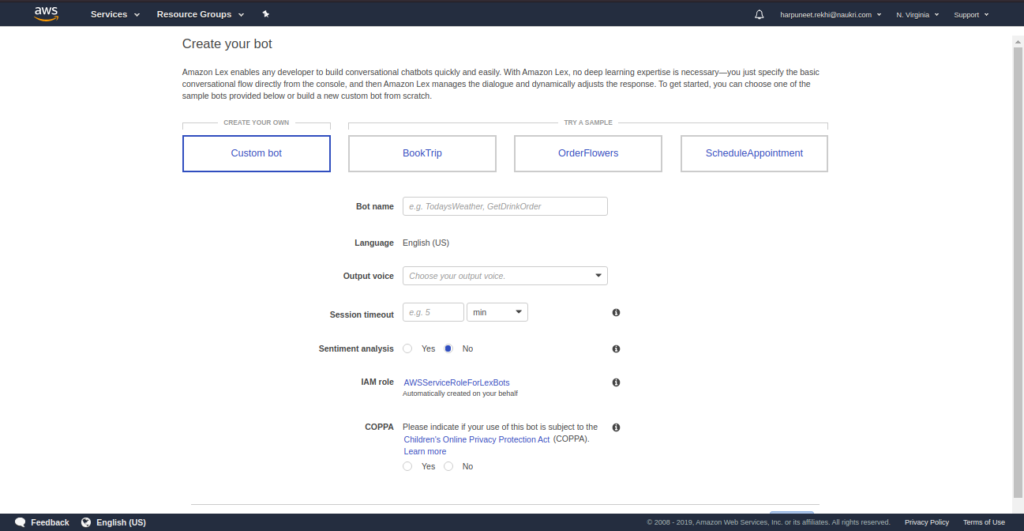
1. Create a Custom Bot and provide the Bot Name, Output Voice and Assign an IAM Role.
2. Once you’ve created the bot you then land on the Bot Creation Interface where you can add custom slots and add custom intents under the Intents and Slot Types subsection.
3. You can add utterances from under the Sample Utterances subsection for each custom intent that you create so that it aids the bot while doing intent classification and slot filling.
4. You can also define slots that are required to fulfill an intent and provide follow up questions to help in the slot filling activity against each slot in the Slots subsection.
5. Apart from the above, there are also 2 AWS Lambda hooks that you can configure for each intent, Validation and Fulfillment Lambda Hooks, a more detailed explanation of each will follow in the next part of this series where I will show how to drive the Amazon Lex Bot using an AWS Lambda Function. These are available under the Lambda initialization and validation and Fulfillment subsections respectively.
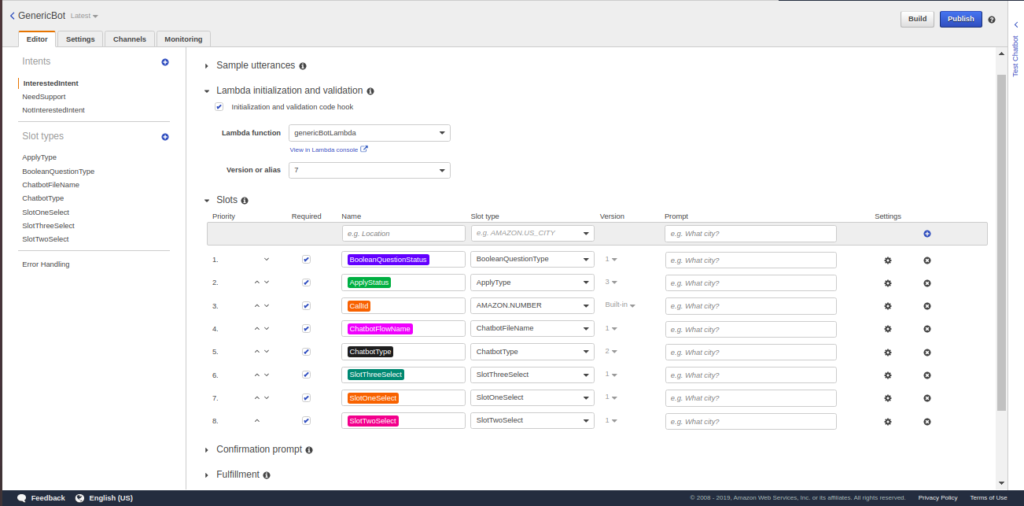
6. There is a separate Error Handling section where you can configure fallback prompts and the number of retries allowed by the bot.

7. Once you have set up all of the above details and provided the inputs to the subsections, you can proceed and build the bot.
8. Once the bot is built you can then Test the bot in the Test Chatbot subsection as shown below.

You’ve now created the Amazon Lex Bot that can be used for automating the calls, in the next part of this series we will have a look at how you can drive this bot by making use of AWS Lambda Functions.
Stay tuned and do provide a clap if you liked the blog!